

Tempering chocolate is a crucial stage in working with chocolate, both for bean to bar makers and chocolatiers. It’s notorious for being both tricky but essential to master!
Not sure where to start? In this post we will explain what tempering chocolate means and show you how to temper chocolate at home.
What does it mean to temper chocolate?
Tempering chocolate is the process of raising and lowering its temperature to alter the crystal formation of the chocolate. Why is it done? Because chocolate that’s tempered has a glossy look and distinctive snapping sound when it’s broken.
The word ‘temper’ actually comes from metallurgy (the science of working with metals), and means ‘to improve the hardness by reheating and then cooling.’ This is exactly what happens with chocolate.
But to understand tempering, we first need to understand cocoa butter. Cocoa butter is the fat inside the cocoa beans used to make chocolate. Cocoa butter is also polymorphic, which means that it can exist in various different crystal forms. In fact, cocoa butter can exist in six crystal formations.
The Crystal Structures of Chocolate
Although chocolate can exist in six different forms, only one form is the desired shiny hard chocolate that’s found in the shops. This is the beta crystal, or fifth state (sometimes referred to as Type V).
Type V, unlike the other five states, creates perfect shiny and snap-ready chocolate. When the chocolate is first heated, crystals will form in all six states, but through the process of tempering, we reduce and destroy Type I – IV.
The final state, VI will form in chocolate that has been tempered for a few weeks and is the hardest and most stable of all – but for most chocolate work Type V is what you’re aiming for.
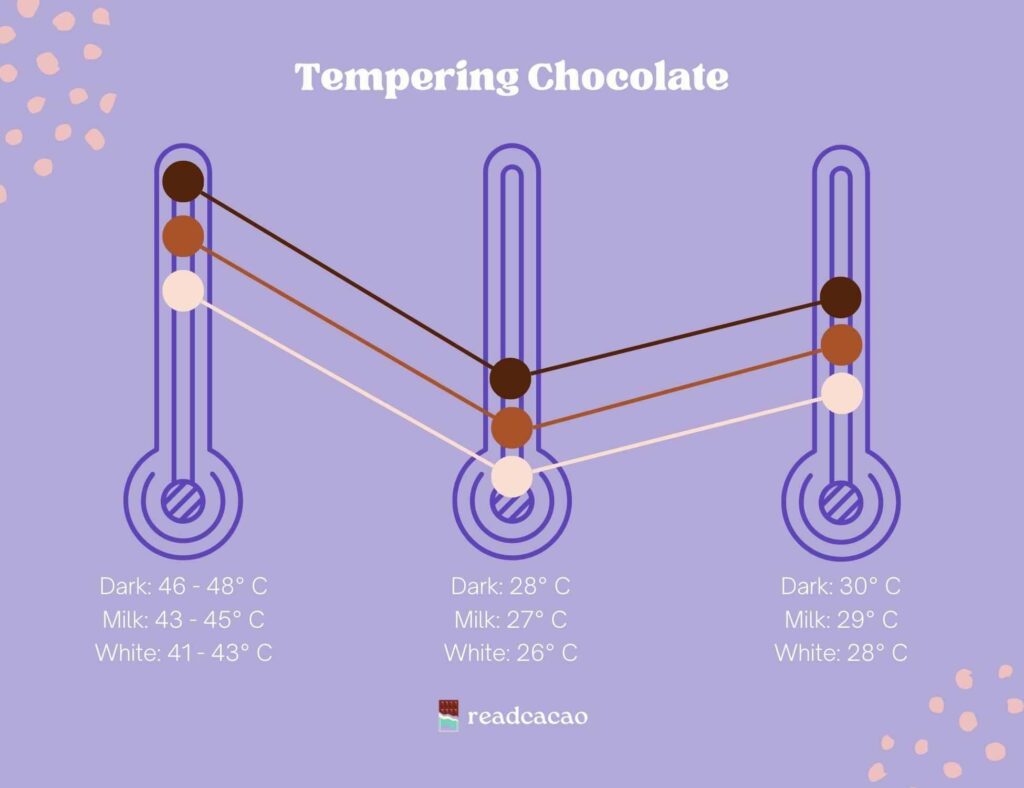
The three types of chocolate (milk, white and dark) have different melting points. Why? Because they contain different amounts of cocoa butter.
Milk and white chocolate also both contain high levels of milk fats. These milk fats make tempering a little more complicated than dark chocolate which contains no milk, so make sure to use the right temperatures as shown in the image below!
Why do we need to temper chocolate?
So now that we know the science behind tempering – we need to understand why we temper chocolate. And more importantly, what happens when we don’t temper the chocolate. Well, without tempering chocolate you have a few problems, which we’ve listed below.
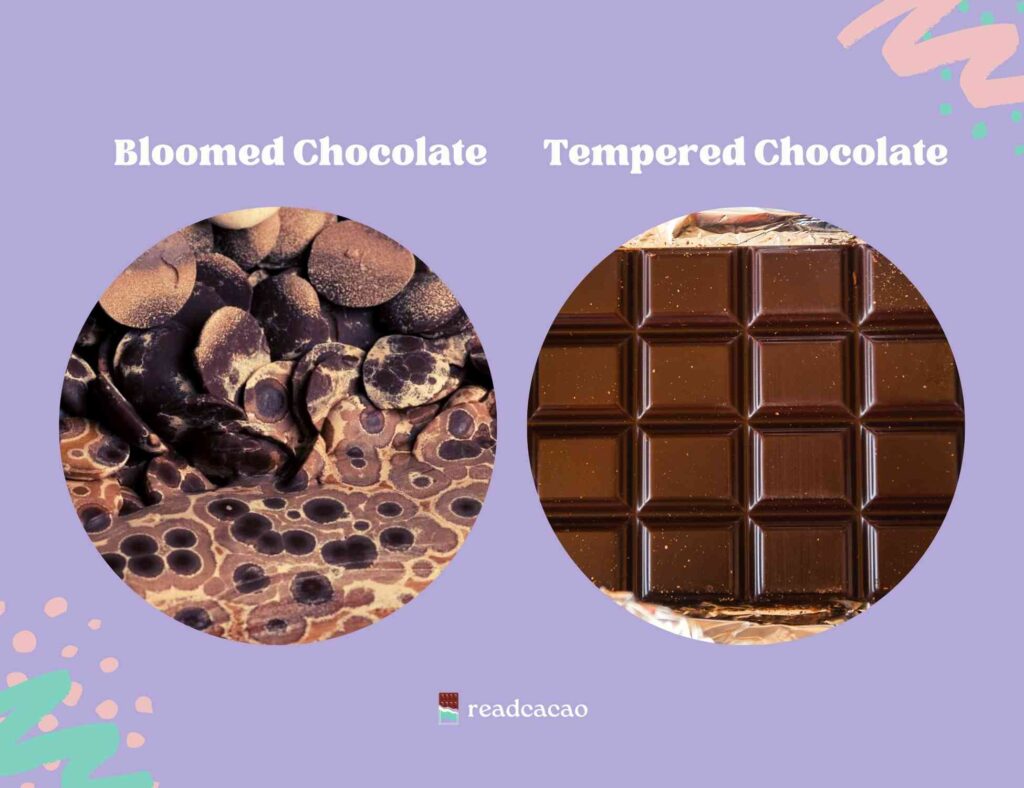
Untempered Chocolate
- Easily blooms and is prone to white streaks, spots and marks
- Has a dull surface
- Has a dry, crumbly mouthfeel
- Breaks apart easily without any snap (it can bend or crumble in your hands instead)
- Very difficult to remove from a chocolate mould, because it gets stuck or breaks
- Melts too easily and quickly
Tempered Chocolate
- Shiny, glossy surface
- Has a smooth, creamy mouthfeel
- A satisfying snap when you break off a piece
- Should easily pop out of a chocolate mould when turned upside down and given a slight tap
- Stays solid in warmer temperatures
The advantages of tempered chocolate will mostly affect the texture, mouthfeel, and appearance of chocolate. That said, if you’re mixing chocolate into baked goods, for example, or anything where the texture and appearance aren’t important then untempered chocolate will work fine.
Top tip: When our chocolate goes out of temper (like when it’s left to get too warm or in opened packaging for too long) we save this for brownies or drinking chocolate. Even bloomed chocolate is fine to eat and is not a type of mould.
How to temper chocolate
1. The Tabling Method (difficulty level ⭐⭐⭐)
This ones for the traditionalists, and it’s both the oldest and most impressive (looking) way to temper chocolate.
For this method you need:
- A marble or granite surface
- A double boiler/bain-marie (a heatproof bowl over a saucepan)
- A chocolate scraper
- A pallet knife
- A thermometer
Pros
The clear advantage to the tabling method is the unmatched artistry and theatre. This method isn’t just beautiful to watch, but it allows chocolate lovers to really connect with their work whilst having a hands-on and truly artisan chocolate experience. This is also the most traditional method, and it’s an amazing feeling to keep these older skills alive.
Cons
This method is the most difficult to master and requires some skill. You ideally need a clean, cool marble or granite surface – which of course not everybody has access to. This is also a more time-consuming method and will require you to work fast and focussed. You also have to be ready for an arm workout as you’ll be moving the chocolate around the table and in and out of the bowl.
Method
- Melt your chocolate in a heatproof bowl above a simmering heat until it reaches 48°C
- Pour 2/3 of your melted chocolate onto a clean, marble or granite surface
- With your scraper and pallet knife, spread the chocolate back and forth until it begins to thicken
- When this chocolate on your slab has reached 28°C you can add it back to the remaining melted chocolate to seed and cool it, stirring constantly. This should bring all of the chocolate to temper at 30°C.
- You can test out a small amount of your chocolate on a piece of baking parchment. If it peels off and has a glossy sheen after 5 minutes, you’re done!
Top tip: A bit worried about trying this method out for the first time on your own? Check out this video by chocolatier Paul A Young!
2. The Seeding Method (difficulty level ⭐⭐)
Tempering chocolate with the seeding method is a great option for having a hands-on experience without requiring a marble table.
For this method you need:
- A double boiler/bain-marie (a heatproof bowl over a saucepan)
- A thermometer
Pros
The great thing about the seeding method is that it doesn’t require a lot of equipment or preparation. However, it still gives you the same professional result. Not everybody has access to a marble surface for the tabling method, so this is a great alternative.
Cons
You’re limited by the size of your bowl (and arm strength). Therefore, this isn’t suitable for very large amounts of chocolate. Moreover, the steam can get very hot. So care needs to be taken when melting the chocolate as any burning will mean having to start again.
Method
- Fill a heatproof bowl with 200g of dark chocolate over simmering water (make sure your water doesn’t touch the bowl)
- Melt the chocolate until it reaches 48°C
- Remove the chocolate from the heat and add in the remaining 100g of dark chocolate. Mix thoroughly until combined
- When the chocolate is melted and smooth, and the temperature reaches 28°C you need to put it back over the pan of simmering water
- Stir the chocolate continuously until it goes back up to 30°C and looks glossy, then remove from the heat
- You can test out a small amount of your chocolate on a piece of baking parchment. If it peels off and has a glossy sheen after 5 minutes, you’re done!
3. The Tempering Machine (difficulty level ⭐)
This is, of course, the easiest method and most practical for larger-scale chocolate production. However, not all tempering machines are created equally. But don’t worry, we’ve listed some great options for you below.
For this method you need:
Pros
The pros of this method are its ease of use with very little learned skill required. It’s also the least time-consuming method which means busy bees can be getting on with other tasks whilst the chocolate almost tempers itself. And another great plus for this method is that chocolate tempering machines vary in size and go from small and compact to very large. This makes it ideal for different kitchen sizes, including big chocolate manufacturers.
Cons
This method is not as artisan and hands-on as the more traditional methods, so it may appear less impressive and theatrical if you have an audience for your chocolate production. It’s also a lot more expensive to buy a tempering machine than say, a handheld thermometer, so it won’t be practical for every budget. This option also requires the space that a tempering machine takes up, which might not be worth it for hobbyists.
Method
Tempering chocolate with a tempering machine is quite self-explanatory and doesn’t require as much work as the other options. The exact method will depend on your specific machine, so make sure to check the instructions.
What equipment do I need to temper chocolate?

- Material: 15 4/5” x 11 4/5” serving board made from 100% pure polished marble stone.
- Thickness:1/2”

- High precision infrared thermometer that can measure temperature range of -50°C~550°C (-58°F~1022°F) in only 0.5 seconds

- Ergonomic wood handle
- Stainless-steel blade

ACMC Tabletop Chocolate Tempering Machine
- 6 lb capacity

ChocoVision Revolation Delta Chocolate Tempering Machine
- Fully automatic chocolate tempering
- 17 lb. capacity
- Extended Temper Mode (stays in-temper for 18 hours or more)
- Stainless Steel Design
- NSF and UL Certified
- Manual Temperature Adjustment (up to 120 degrees during the Melt Cycle, 100 degrees in Temper Mode)
Frequently Asked Questions (FAQs)
How can I tell if my chocolate is tempered correctly?
To tell if your chocolate is tempered, smear a small amount of the chocolate onto some baking paper. Check back on the chocolate in five minutes. If it’s tempered, the chocolate should be glossy and peel right off the paper with ease.
What if my tempered chocolate goes out of temper again?
Even perfectly tempered chocolate can become untempered again. This usually happens when you leave your chocolate at the wrong temperature for too long, destabilising the crystals. The good news is, chocolate can be re-tempered again and again.
What happens if I burn my chocolate?
Unfortunately, you cannot salvage burned chocolate. Burn chocolate will affect the texture and the flavour. If your chocolate has been overheated to the point of tasting burnt we recommend throwing it out and starting over.
Remember, white and milk chocolate has lower burning points, so cannot get as hot as dark chocolate.
Why has my chocolate seized?
The main cause of chocolate seizing is when water is mixed into the melted mixture. This can happen if you slip whilst heating it using a bain-marie. Or by not completing drying the marble surface or using a wet utensil.
Seized chocolate is ruined, and there’s really no going back. So be very careful to avoid this!
What is the difference between melting chocolate and tempering chocolate?
Tempering chocolate is a process of heating and cooling chocolate to produce a shiny, smooth texture with a crisp snap when broken. Melting chocolate simply involves heating chocolate until it liquefies. Tempering is used if you plan to turn the chocolate solid, melting chocolate is fine if you plan on dipping fruits or nuts and eating it there and then.
I’ve tried all of these steps, why is my chocolate still not tempered?
If you have followed the instructions exactly and haven’t had the results you want yet then there could be an issue with your thermometer. You need a very accurate thermometer when working with chocolate, so double check this before giving up!